
Install drawer slides can seem daunting, but with the right steps, it can be a straightforward process. Here’s a friendly, detailed guide to help you through each part of the installation.
Step 1: Mark the Placement of the Slides
Start by measuring from the inside floor of your cabinet. Mark a height of 8¼ inches near the front and back of each side wall. Using these marks as a reference, take a straightedge and draw a level line across each inside wall of the cabinet. Next, make a mark on each line, placing it 7/8 inch from the front edge of the cabinet. This distance accommodates the thickness of the drawer front and allows for a 1/8-inch inset.

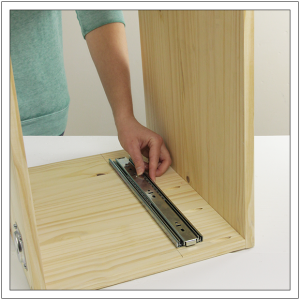
Step 2: Position the Slides
Take the first slide and align the bottom edge just above the line you drew. Ensure that the front edge of the slide is positioned right behind the mark near the cabinet face. This alignment is crucial for a smooth installation.
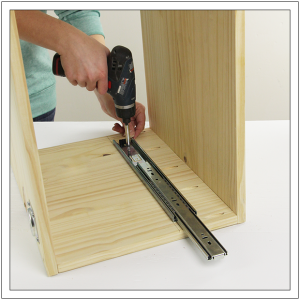
Step 3: Install the Slides
Hold the slide firmly in place. Slide the extension forward until both sets of screw holes become visible. Using a drill/driver, drill shallow pilot holes in one screw hole near the front and one near the back of the slide. Then, with the screws provided, securely mount the slide to the inside wall of the cabinet. Repeat this process to mount the second slide on the opposite side.
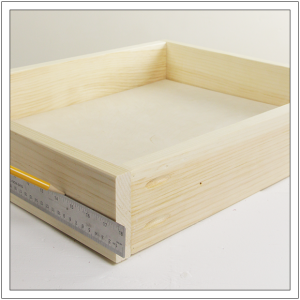
Step 4: Mark the Drawer Sides
Using a tape measure, find the center of the height of the drawer box and mark it on its outer side walls. (Keep in mind that the drawer is shown here without the drawer face, which you’ll install later.) With a straightedge, draw a horizontal line along the outside of the drawer box on each side to guide your next steps.
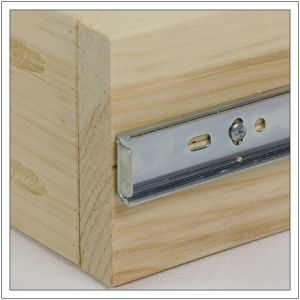
Step 5: Position the Slide Extension
Remove the detachable section from each drawer slide and place it on the corresponding side of the drawer. Make sure the slides are centered on the horizontal lines you just marked and flush with the face of the drawer box. This positioning ensures smooth operation when the drawer is installed.
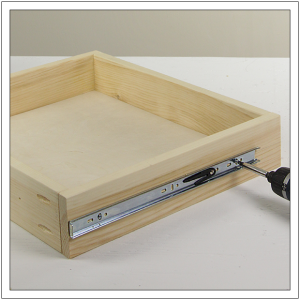
Step 6: Attach the Slides to the Drawer
Using a drill/driver and the screws that came with your drawer slides, mount the slides securely to the drawer. Take your time to ensure everything is aligned correctly.
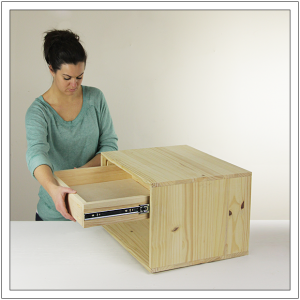
Step 7: Insert the Drawer
Hold the drawer level in front of the cabinet. Carefully place the ends of the slides attached to the drawer into the tracks inside the cabinet. As you press evenly on each side of the drawer, slide it into place. You might find that the initial slide inward requires a bit more effort, but once the tracks are engaged, the drawer should slide in and out smoothly.
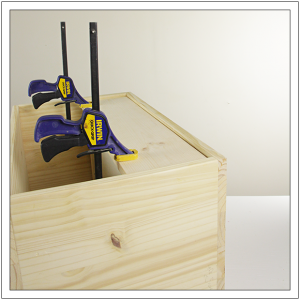
Step 8: Position the Drawer Face
Apply wood glue to the face of the drawer box. With the drawer closed, position the drawer face so that there are equal gaps along the top and side edges. Use clamps to hold the drawer face securely against the drawer box while the glue sets.
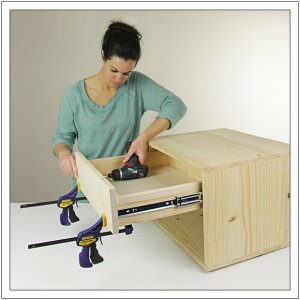
Step 9: Attach the Drawer Face
Carefully slide the drawer open again. Drive 1-inch screws through the holes in the drawer box into the backside of the drawer face to secure it in place. Make sure everything is aligned before tightening the screws to ensure a perfect fit.
By following these steps, you’ll have successfully installed your drawer slides and attached the drawer face. Enjoy the smooth operation of your newly installed drawers! If you have any questions along the way, feel free to reach out for help. Happy building!


Leave a Reply