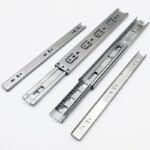
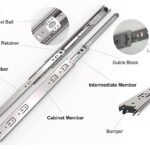
Imagine smooth, satisfying drawer operation—no more clunky door slams or drawers jamming shut. Upgrading your drawers with slides not only improves convenience, but also adds a touch of refined professionalism to your home. If the thought of tackling this project makes you feel a little overwhelmed, relax! This guide will walk you through the basics of installing drawer slides, even if you’re new to DIY. Plus, you’ll learn how to install soft-close drawer slides to prevent noise and damage.

Types of Drawer Slides
Before you get started, it’s important to understand the hardware. Here’s a breakdown of the most common types of drawer slides:
- Ball Bearing
Ball bearing slides feature precision tracks and ball bearings for effortless gliding. They’re ideal for heavy drawers or frequent use. - Undermount
These slides are hidden underneath the drawer for a sleek, seamless look. They’re perfect for minimalist designs or drawers you want to appear frameless. - Center Mount
Center mount slides install in the center of drawers and cabinets, providing good stability and allowing for side-to-side movement. They’re a versatile choice for most drawers. - Roller
Roller slides are an affordable option that use rollers for basic sliding functionality. They work well for lighter drawers or occasional use. - Wooden
Traditional and sturdy wooden slides require more maintenance and are prone to sticking. They work best for a rustic aesthetic or special projects. - Side-mount
Side-mount slides mount to the sides of drawers and cabinets, providing good support and stability. They are a common and durable slide for most drawers.

Install Drawer Slides Tools Required
Once you’ve chosen your slides, gather your tools:
- Tape measure
- Level
- Pencil
- Drill
- Screwdriver
- Clamp (optional)
- Safety glasses
Step-by-step installation
Step 1: Measure twice, slide once
Precision is key! Measure the width and depth of your drawer opening and mark the mounting points for the drawer slide brackets on the cabinet and drawer box. Keep in mind that most slides have some side-to-side adjustment, so don’t worry about millimeter-level perfection at this stage.
Step 2: Prepare for takeoff
Drill pilot holes at the marked points using a drill bit that is slightly smaller than the diameter of the screws. This prevents splitting of the wood and ensures a clean, secure installation.
Step 3: Slide In
Secure the drawer slide brackets to the cabinet and drawer box using the provided screws. Tighten them snugly, but not too tight—you’ll want some wiggle room to make adjustments later.
Bonus Tip: Use drawer slide clamps to increase installation precision and make installation easier. These handy tools ensure perfect alignment and can save you time and effort.
Step 4: Test, Test, 1, 2, 3
Slide the drawer in and out to check that movement is smooth and alignment is correct. If it doesn’t feel right, loosen the screws slightly, adjust the slide, and retighten. Repeat until you achieve a perfect glide!


Install Drawer Slides Conclusion
Voila! You’ve successfully installed your drawer slides. Now you can enjoy the satisfying, noise-free operation of your newly upgraded drawers. If you run into any problems, consult the instructions that came with your specific drawer slide. For more complex projects or heavy drawers, consider enlisting the help of a professional installer.


Leave a Reply